How To Do SEO For Magento [Complete Guide]
![How To Do SEO For Magento [Complete Guide]-01](https://theecommmanager.com/wp-content/uploads/sites/6/2023/02/How-To-Do-SEO-For-Magento-Complete-Guide-01-1024x576.png)
Optimizing a Magento website (or any eCommerce website for that matter) can be somewhat tricky at times, particularly when we attempt to make sense how best to optimize a specific expression or phrase on a particular page while we navigate over 15,000 files and hundreds of different configuration settings. It can sometimes seem a little daunting, but thankfully, it's not all that bad.
Magento has already provided us with a variety of tools that we can use to better prepare our Magento store for search engines but due to the open source nature of the Magento platform, there exists a growing community of developers and SEO specialists who constantly innovate and experiment with different ways to improve the framework.

The goal of this guide is to provide you with tips, tricks, and best practices to help improve your Search Engine Optimization practices on your eCommere store. While I do use Magento as my baseline, many of these practices can be extrapolated to other eCommerce platforms such as Shopify, Woocommerce, BigCommerce, Volusion, and more.
Modules:
- Overview
- Focusing On Your Keywords
- Homepage Optimization
- Optimizing Category Hierarchy
- Optimize CMS Pages
- Optimizing Titles, Content, and Meta Information
- Adjusting the Magento System Configuration
- Defaults Settings for <Head> Section
- XML Sitemap
- Google Analytics
1. Overview
Magento is fastly becoming the eCommerce platform of choice. One of the fundamental reasons is the fact that from the ground-up, it has been manufactured with the adaptability and flexibility required to optimize each page, every product, and every snippet of code within its framework for search engines such as Google, Bing, and more. That is, assuming you know where to look and how to perform an SEO audit and execute on it.
There are numerous similarities between Magento Community Edition and Magento Enterprise Edition, but also a few major differences. Wherever conceivable I will attempt to highlight some of the features that may appear in one or the other of these platforms, and also reference in which version certain features were added or removed.
For the purpose of this SEO for Magento guide, we will be utilizing Magento Community Edition 1.9.0.0. As of the time of releasing this information, it is the latest stable release of the free edition (or at least the one I have access to). This ought to permit store owners, Magento developers, and SEO specialists and beginners alike access to all of the features contained within this guide
In this part, we will cover the accompanying:
-
Attempt to give you an understanding the structure of a site, the purpose of optimizing your e-commerce site, and the relationship between 'keywords' and their position on a site.
-
Understanding the buying intent of our site visitors and how this purchasing intent may change depending on the type of page they enter our website with (shopping or content).
-
The roles of content management system (CMS) pages and their primary uses in search engine optimization (SEO)
-
The importance of the content, title, and meta tags and Magento's default
data -
How to change your category structure to benefit your SEO campaign
-
How to set up an XML sitemap and Google Analytics E-commerce tracking through Magento's admin panel and code.
2. SEO: Focusing on your keywords
An entire book could be written on keyword distribution for e-commerce websites; however, as the aim of this post is to cover the first aspects of optimizing a eCommerce store, we cannot go into too much depth. Instead, we'll focus on three major considerations when choosing where to place our keywords within a eCommerce store:
- Purpose: What is the purpose of optimizing this keyword?
- Relevance: Is the keyword relevant to the page we have chosen to optimize it for?
- Structure: Does the structure of the website re-enforce the nature of our keyword?
The reason for selecting keywords to optimize on our eCommerce store must always be to increase our revenue. It is true that (generically speaking) optimizing keywords means driving visitors to our site, but in the case of an eCommerce site, the deciding objective—the true justification of any SEO campaign—must be growing the number of sales. We should then make sure that our visitors not just visit our website, but visit with the intention of purchasing something.
The keywords we have decided to optimize must be applicable to the page we are optimizing them on. The page, therefore, must contain elements specifically related to our keyword, and any random material(s) must be kept to a low level. Driving potential customers to a page where their search query is unrelated to the content not only disappoints the visitor, but also lessens their longing to purchase from our website. Commonly this will lead to an extremely high bounce rate (over 70%).
The structure of your site must supplement your chosen keyword. Competitive phrases, generally broader phrases with the highest search volumes, are naturally the hardest to optimize (simply because the competition is too large). These sorts of keywords require a strong page to effectively optimize them, don't hope to rank very high for these broad terms anytime soon, it will take months if not a year to get some traction on the internet (an example "hockey sticks"). By and large, the quality of a page is related to its level or tier within the URL. Case in point, the home page is ordinarily seen as being the strongest page suitable for high search volume broad phrases followed by a tiered structure of categories, subcategories, and finally, product pages. Focus on matching those important terms on your homepage, then categories, and so forth. You can focus on keywords as you progress through your site, just make sure to build foundational tactics to hit all sections.
Use this as a simple rubric:
Top Tier pages: broad phrases
Middle Tier (category) pages: less broad phrases
Third tier (product) pages: very distinct phrases and keywords

3. Homepage Optimization
Don't worry you can be excused for thinking that improving our most competitive keyword (super broad keywords such as candy, or hockey sticks) on the home page would lead to the best results. Be that as it may, when you take into account the relevance of our home page, does it truly match our keyword? The answer is; No, it normally doesn't.
Much of the time, the home page should be utilized solely as a place for building your brand identity. Our brand identity is the heart and soul of your business and it is how customers will remember us long after they've purchased our goods and exited our website. Think about some of the big brands and how they make you "feel". McDonalds, Starbucks, Coca-Cola, Amazon, Wal-mart. They all elicit a different emotion response and for some it is happy and for others it is stress. Now take some time to think about how you want your online store to elicit emotions and that will start you off to create your brand identity.

To move forward and optimize your homepage you can use high level keywords on your homepage that match the brand. For example, if you are the Canadian Hockey Stick Company it might be acceptable for you to use the words "Hockey Stick" on your homepage. It would also work out if you were selling a single product on a one pager (a website without many product detail pages).
Keep in mind the buying intent of your website traffic. The buying intention of our visitors will almost certainly differ between your homepage and your product details page. If you think about your website as a funnel with the Homepage being at the top of the funnel and the checkout success page being the bottom of the funnel the buying intent is lowest at the top and the highest at the bottom. Typically, a user entering our website via a broad phrase will have less of an intention to buy our products than a visitor entering our website through a more specific, product-related search term. This is especially true if you have a site that provides a lot of valueable content to visitors other than just buying items. An example here would be you offering a fun fact or history lesson with each hockey stick that you are trying to sell. While the goal is to convert people and earn revenue they will also learn about the history of hockey and of the stick manufacturer.
In summation you want to focus your meta descriptions and meta title on broad keywords to bring in high level, low buying intent customers. Ideally, if you are running ads or optimizing correctly people will not enter through your homepage as much as category or product pages, but people have a tendency to fall back to the homepage as a warm cozy blanket.
4. Optimizing Category Hierarchy
Typically, the most competitive keywords on your website (regardless of how huge or tiny) will be classified as broad keywords, implying that their relevance could be attributed to an assortment of similar terms. This is the reason it makes sense to use top-level or parent categories as a basis for our broad phrases.
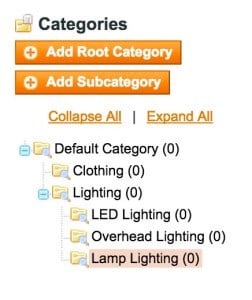
To utilize an example, Lighting would be an ideal top-level category to contain subcategories such as ''LED Lighting", "Overhead Lighting", and "Lamp Lighting", with content on our top-level category page to highlight these subcategories. Within the Magento admin panel, go to Catalog > Manage Categories so we can arrange our category structure to match our keyword relevance and broadness.
In a perfect world, we would plan out our category structure before implementing it; unfortunately, that is not always the case (actually it is typically not the case; most eCommerce managers don't even consider this). If we need to change our category structure to better match our SEO strategy, Magento provides a straightforward approach to adjust our category hierarchy (layout).
For example, say we currently have a top-level category called Lighting, and within this category, we have LED Lighting, and we decide that we're only optimizing for LED Lighting instead of simply "Lighting"; we can use Magento's drag-and-drop functionality to move LED Lighting to become a top-level category.
To do this, we would have to perform the following steps:
- Navigate to Catalog > Manage Categories.
- Drag our LED Lighting category to the same level as Lighting.
Well lookie there! Look at your URL bar in on the front-end of the website and you will see that our URL has now changed from http://www.mydomain.com/lighting/led-lighting.html to http://www.mydomain.com/led-lighting.html.
We will also notice that our old URL now redirects to our new URL; this is due to Magento's pretty awesome internal URL Rewrite System (but it does have it's quirks that I can get into later in another article). When moving our categories within the hierarchy, Magento will recall the old URL path that was specified and automatically create a redirect to the new location. You don't have to do anything if you are properly dragging categories around.
This is fantastic for our SEO strategy as 301 redirects are vital for passing on authority from the old page to the new.
A 301 redirect is one of the most useful tools in maintaining a search engine's understanding of our website pages.
If we wanted to have a look at these rewrites ourselves, we could perform the following steps:
- Navigate to Catalog > URL Rewrite Management.
- From the table, we could find our old request path and see the new target path that has been assigned.

Not only does Magento keep track of our last URL, but any past URLs also become rewritten, meaning you can make infinite category changes depending on the top level keywords you want to rank for. It is therefore not surprising that a medium to large Magento store with many SKUs, products, and categories could have thousands upon thousands of rows within this table, especially when each URL is rewritten on a per-store basis. If you have a smaller store it isn't going to be a big deal, but depending on the size of your catalog one single change to a category could take longer to save. Keep things simple if possible.
Another important point to note is that your category "URL key" (attribute url_key) may change depending on whether an existing category with the same URL key at the same level had existed previously in the system. If this circumstance happens, an automatic incremental integer is appended to the URL key, for example, led-lighting-2.html. Magento Enterprise Edition has been enhanced to only allow unique URL keys. You can't have duplicate URLs. While that does help your SEO inherinly you might not know why you are being denied the ability to save a category. Stop and look if there is already a category named LED lighting.
Well that is it for optimizing your category hierarchy and what you should focus on. Take a look at your category structure and make sure that the broad keywords you are trying to rank for are as close to the top of the hierarchy as possible. You want them to be Level-0 (top level) or Level-1.
5. Optimize CMS Pages
CMS pages inside Magento are primarily utilized as information or data pages. Terms and conditions, privacy policy, frequently asked questions, customer service, and returns policy are all examples of CMS pages that are designed and configured within the Magento admin panel. You can get to them by navigating to CMS > Pages.
Out of the box, the home page of a Magento community/enterprise store is a CMS page with the title "Home Page". The page that is served as the landing page can be configured within the Magento Configuration under System > Configuration > Web > Default Pages.
The most imperative piece of a CMS page setup is that its URL key is always relative to the website's base URL. This means that when creating CMS pages, you can manually choose how deep you wish the page to exist on the site. This gives us the ability to create as many nested CMS pages as we like. From an SEO perspective the higher the page is in the hierarchy the more easily it is to rank the page higher. Truly, you don't want your FAQ page to be the number one ranked page on your site, but it doesn't hurt to get people on your site however possible.
Another important point to note is that, by default, CMS pages have no file extension (URL suffix) as opposed to the category and product URLs where we can specify which extension to use (such as HTML or HTM, etc.)
For CMS pages, the default optimization methods that are available to us are found within the Page Information tabs after selecting a CMS page:
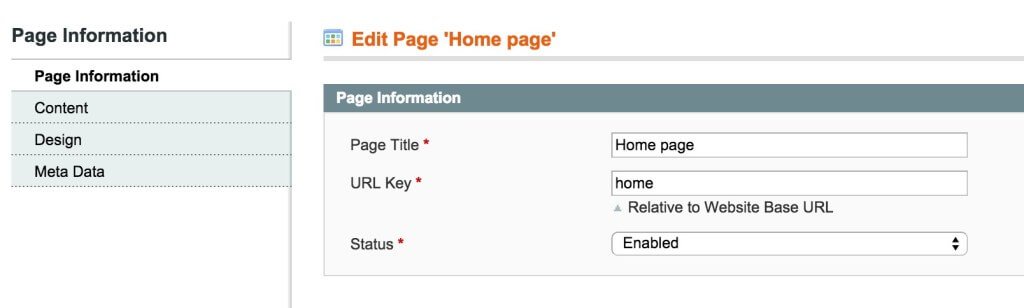
Under the Page Information subtab (see the screenshot above) in which y0u can choose our specific Page Title and URL key (www.google/urlkey). You want your page title to be the keyword that you are trying to rank the page for. For example, a CMS/content page about golf balls. You would want to name your CMS page, Tips for Golf Balls as that could potentially be a longtail keyword search.
Futhermore, under the Content subtab, we can enter our Content Heading (by default, this gets inserted into an <h1> tag) and enter our body content that is actually on the page. Again keep in mind that this page needs to be kept to the topic that is featured in the page title and the content heading. If you are writing about a lot, the page may need two or three different pages.

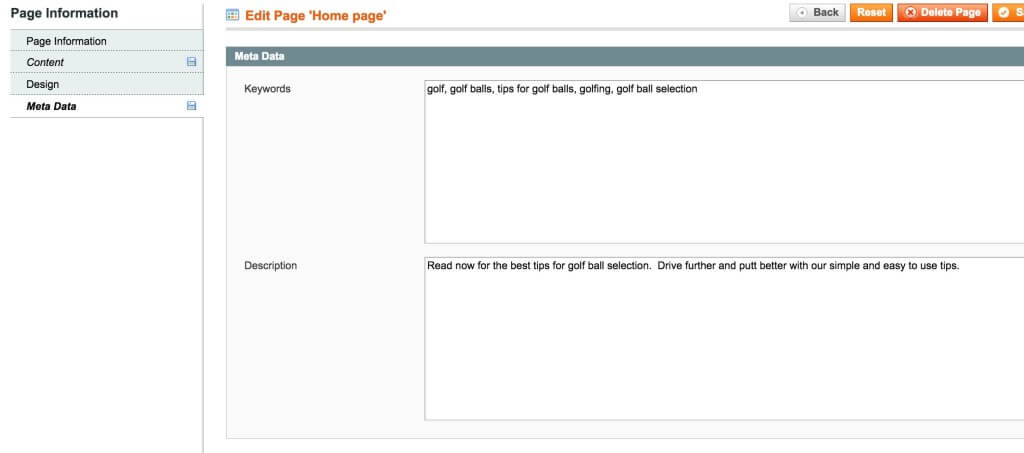
Under the Meta Data subtab, we can specify our keywords and description. Keywords aren't utilized as much in search engine optimization as about 5 years. Google has stated it isn't considered keyword metas in it's algorithm.
As specified beforehand, we would focus optimization on these pages purely for the intent of our visitors. In the event that we were not using custom code blocks to display product information, we would not optimize these information pages for keywords relating to purchasing a product but rather for content. If you don't have a blog on your website these pages would serve for editorial content and other "blog" type content.
Have you read the other articles about how to optimize your Magento or eCommerce store for SEO? Catch up now. Read the full Magento SEO Guide.
6. Optimizing Titles, Content, and Meta Information
Inside CMS pages, category pages, and product pages, there will be the option to select and enter in your Page Title, Meta Description, and Meta Keywords, and above all, the capacity to add applicable content to your pages.
In the event that we examine an ordinary Search Engine Results Page (SERP)—in this use case Google—obtained using the search query 'Hockey Sticks', we will see that two of the components in Magento are used directly in the result listings (Title and Meta Description):

The code used to display the Google search result was:
<title>Stick Blades - Hockey Monkey</title>
<meta name="description" content="When you're standing in shoes, your stick should come at least to your nose. Always be ready with two sticks as hockey sticks sometimes break." />
Contingent upon the search query used, Google may return the meta description, or on the other hand, extract a snippet of text from the 'live' content that it believes to best represent that page for the given query. This typical grabs the first characters on the page or scraps the page and grabs the H2 tags. This isn't 100% fool proof and normal provides the wrong user experience. The same applies to title tags; when a more specific query is used, the default title tag may be changed to better suit the search query.
An example of Google returning extracted content rather than the meta description can be seen here (through the search phrase Hockey Stick):

The meta description that is present on the page is:
<meta name="description" content="" />
From this screenshot example, we can see that Google has chosen to return the extracted snippet from the product/search description, most likely due to the meta description being blank or improper for the search term.
The best practices for these elements are well documented in SEO circles, and the following is a brief breakdown of each:
Title: The title tag ought to be kept (preferably) to a maximum of 70 to 75 characters. Any title tag longer than this will be truncated in the SERPs to only those initial 70 to 75 characters. If we are trying to engage a normal visitor's (and potential customer's) interest, we need to be able to do that within those first 70 to 75 characters. Use eye catching words and actionables, such as Shop Now, Buy Now, Sale Now, etc.
Meta Description: The same rules apply to the Meta Description field; Google usually only shows approximately 150-160 characters of meta information below the title tag in the SERPs. A description longer than this may be truncated and the additional characters will not be presented to the person on the results page.
Meta Keywords: It has long been known that most major search engines choose to ignore the meta keyword tag completely, in most part due to keyword stuffing (which is the act of putting dozens of keywords in the field that have likeness to any search query), which was a common practice in past years. Typically, it is more beneficial to remove this tag altogether than to spend time tailoring keywords for individual pages themselves.
Content: This is a subject that has been discussed for years; nevertheless, the acknowledged, general rules are that 400+ words of interesting, quality, and relevant content on every page should put you in good standing with all the major search engines. There are additional reports that state that posts with 2000+ words of quality content provide the best results and result in the best rankings. It is unknown if there is an 'upper-threshold' to the amount of words/content deemed acceptable on any given page. Something to think about is, the fact of the matter is that it gets to be harder to compose significant, quality content the more drawn out that substance gets to be. My rule of thumb (and this is just my opinion) is get to the point, provide value in as little words as possible and share it far and wide. On page experience such as multiple page views and bounce rate will tell Google if the post and website is worth ranking highly.
7. Adjusting the Magento System Configuration
Before I get into this post, I will put a bit of a disclaimer on it and say it is a bit more technical than some of the other SEO posts. If you don't feel comfortable doing these more technical tasks yourself, you can hire a freelance remote developer.
A truly speedy and simple alteration we can make to our entire website URL structure is to remove the default index.php string that is appended to the base URL—for example, http://www.mywebsite.com/index.php/productname.html—and also auto-redirect to our base URL if the non-www version of our domain is entered. You can have a base URL of www. or non-www.
In order to achieve these small fixes, we ought to perform the accompanying steps:
- Navigate to System | Configuration | Web | Search Engines Optimization and set Use Web Server Rewrites to Yes to remove index.php. Just select it and press delete.
- Within this same section but under URL Options, set Auto-redirect to Base URL to Yes (301 Moved Permanently).
As long as your server has been configured correctly and our default .htaccess file is in place (.htaccess is available on Apache and not nginx), Magento will naturally remove the index.php string from our URLs and continue to serve our typical pages.
As said already, Magento comes outfitted with the ability to rewrite URLs for category and product details pages. Contingent upon the design we have chosen, Magento will create entries within its core_url_rewrite table (in the database) to make changes to the URL key of a category or product inside our store.
To alter how Magento modifies our URLs, we can change certain options by navigating to System > Configuration > Catalog > Search Engine Optimizations as shown in the following screenshot:
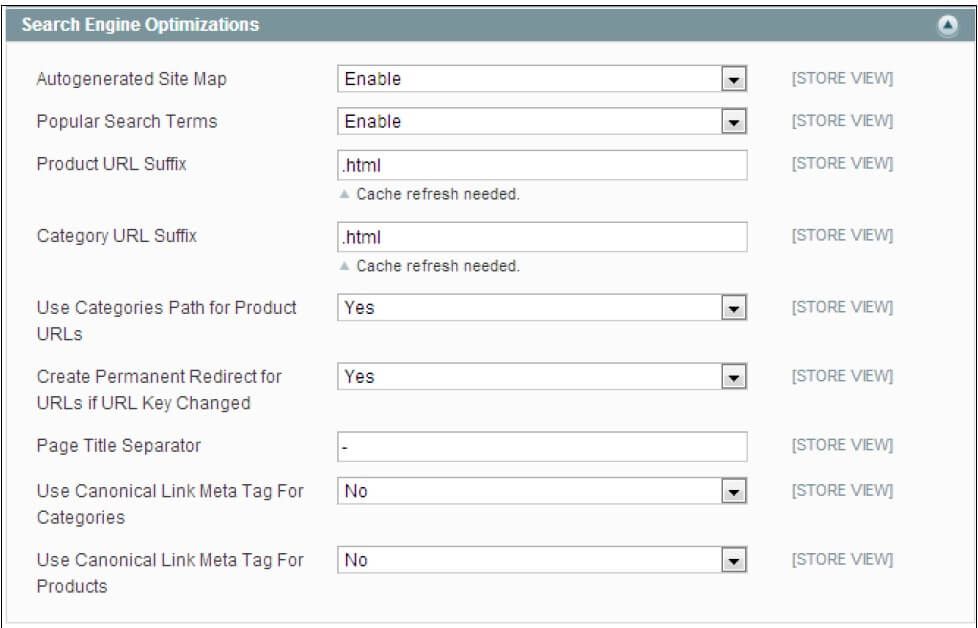
In the event that we examine this config section, we will notice that there are many options, all of which require a little explanation. I will go into more depth so you can understand each section.
Autogenerated Site Map: If you enable the autogenerated site map you will create two pages on our Magento website that display links to our categories and products: www.mywebsite.com/catalog/seo_sitemap/category/ and www.mywebsite.com/catalog/seo_sitemap/product/. If you want, you can submit these urls/sitemaps to Google Webmasters and Bing Webmasters to better index your website.
Popular Search Terms: This enables a page that displays your most popular search terms. This is not hugely relevant for SEO and should only be used as a tool aimed at your visitors rather than for search engines. This creates a word cloud and visual shows search terms.
Product URL Suffix: This adds data to the end of the URL for product pages; the default is .html. It probably makes sense to remove .html from your url. This will help shorten urls and if you ever migrate your site it will be a lot easier to not have to parse ".html" out of every url string.
Category URL Suffix: This group of settings is pretty much the same as the preceding item but for category pages only.
Use Categories Path for Product URLs: With this enabled, Magento will include the category URL key within the URL structure for our product pages (for example, www.mywebsite.com/category-url/product.html). When used in conjunction with Use Canonical Link Meta Tag for Products, this setting may impact our link building capabilities for our cached product pages. I have seen both of these methods used. Again, it is typically easier and wiser to shorten your URLs on your site, however if you do include the category path, it may help Google find out how to categories your site (with broad search terms)
Create Permanent Redirect for URLs if URL Key Changed: This setting will automatically create a rewrite if we ever change the URL key attribute for a CMS, category, or product page. For those that don't know, rewrites are basically 301 redirects. For example if our 'contact-us' and then you want to change it to 'contact-me-now' you can change the URL and the system will automatically forward people that go to 'contact-us' to the proper page url.
Page Title Separator: This is a character that separates the specified page title when browsing through categories and subcategories. An example of this would be a "-", "|", or any other kind of separator.
Use Canonical Link Meta Tag for Categories: With this setting turned on, all categories will contain another tag within their HTML educating search engines where the primary version of the current category page can be found.
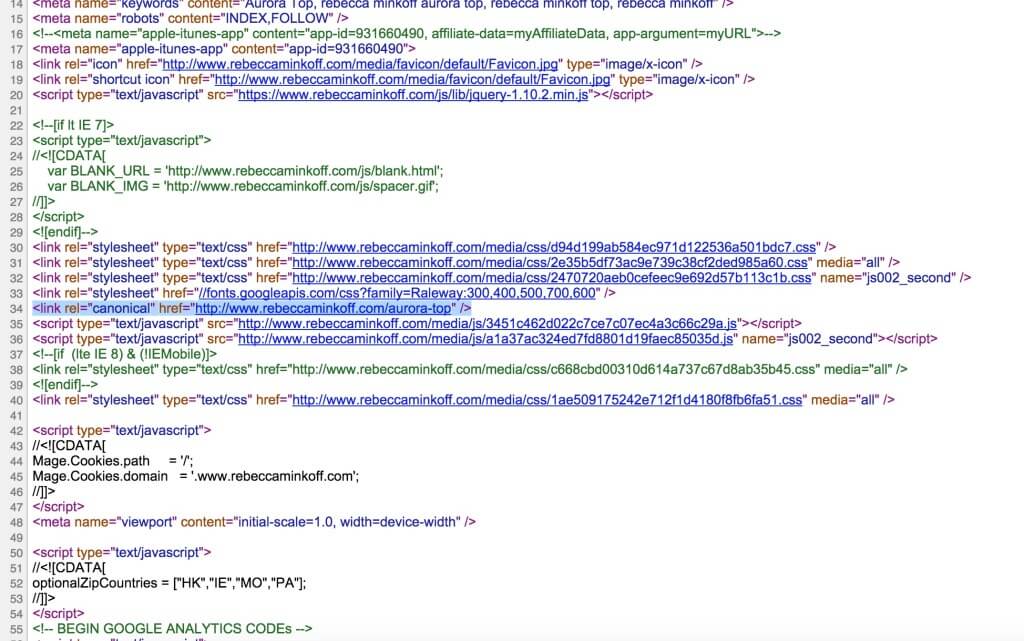
Use Canonical Link Meta Tag for Products: This is the same as the preceding item but will instruct the search engine to look for a primary version of any given product page. I have included an example snippet of how Google would see the product canonical in the source code. Here we can see that Google will always give the link juice to "/aurora-top" no matter how many pages feature the same product. This is useful if you put products in many different categories, such as clothes, tops, shirts, sale, and clearance at the same time.
In my next post I will get into more on duplicate content and how you can steer clear of this SEO mistake.
8. Default Settings for Head Section
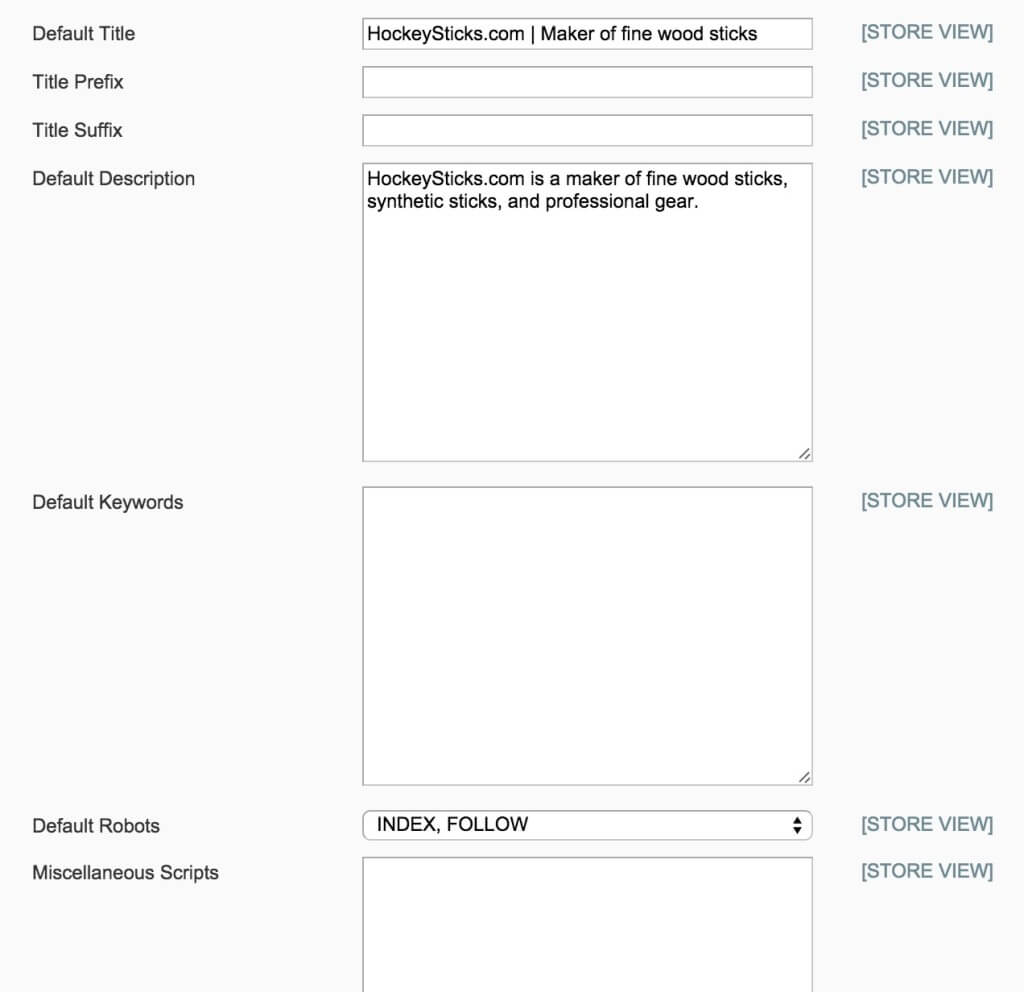
As Magento is such a substantial framework, each component can't be relied upon to be manually entered before being utilized in the system. That is the reason Magento has a fall-back procedure in place for a lot of configurable choices. These can be found within System > Configuration > Design > HTML Head.
For SEO purposes, the main default elements we are interested in are:
- Default Title - the Default Title of the pages. This will only print to the source code when there isn't an explicit title written in.
- Default Description - the Default Title would be the name of your blog and a few featured products or categories. For example, "HockeySticks.com | Maker of fine wood sticks"
- Default Keywords - Google has stated that keywords are no longer tracked or make a difference in search results, so if you leave this blank, then so be it. It isn't a big deal.
- Default Robots - Always set this to Index, Follow for a live site, and NoIndex, NoFollow for development sites to inform Google that your site is available to be crawled and indexed.

These defaults are expected to show content to both users and search engines/web indexes wherever we have failed to populate the applicable field in our admin panel—primarily for CMS pages and categories.
In many instances, Default Title will only be used when a custom development has been made and a title is not specified within the Layout XML, the PHP controller file, or some form of admin configuration. Default Description, however, will be used whenever Meta Description is left unpopulated on a category or CMS page.
Duplicate meta description and title tags are terrible for usability. For any page that we wish to perform well in search engines, we must guarantee that we have a unique meta description, and if possible, a unique, interesting title. This permits web indexes to better perceive individual pages and also makes it easier for users who are searching for our content to instantly find the correct page among multiple results.
For products, Magento handles the default meta description and keywords tags differently; they are usually pre-populated with the following information:
- Meta Title: If this is left blank, the individual product name will be used
- Meta Description: If this is left unpopulated, the product description will be used
- Meta Keywords: If this is left empty, the product name will be used
As our products should all be unique, this built in system is a useful tool for large Magento websites that are set live without all product meta information being initially entered. Most implementations (or migrations) usually have this information blank, so with this fallback you always get something printed in your source code for Google/Bing.
As we know, Magento should just serve up these default attributes in the event that we have failed and fizzled out in some way to enter the information ourselves. To keep up a decent standard of usability for these types of circumstances, it is a best practice to populate these fields with relevant data. The beauty of Magento and it's scalability is that if you have multiple websites in Magento this data can also be modified on a per-store basis.
Navigate to System > Configuration > Design > HTML Head and populate the following: Set Default Title to be relevant to our store or company name
Set Default Description to contain important information, perhaps even contact information for our website. An example of this could be:
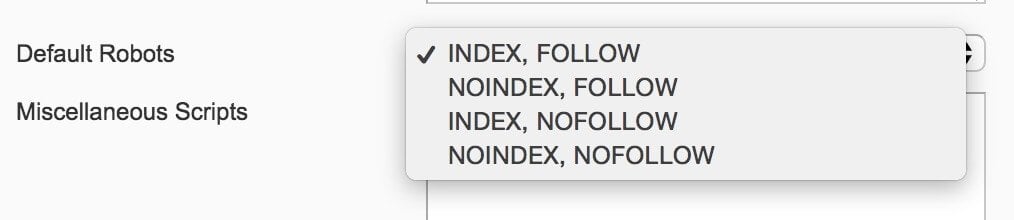
Finally, within our HTML Head section is a small dropdown menu option called Default Robots.
As I mentioned earlier in this topic, when a Magento website is under development on a test URL, we would regularly discover the value of this field to be NOINDEX, NOFOLLOW, essentially blocking search engine spiders from accessing any page in the Magento system. It is therefore of grave importance that, once the website is launched on the live domain, this select option is set to INDEX, FOLLOW, or our Magento website may never be indexed/listed by search engines.
A quick reference for each of the available four options is as follows:
- INDEX, FOLLOW: Allows your website's pages and content to be indexed by the search engine and analyze links found on this page. This is the setting you want your website to be on 99% of the time.
- NOINDEX, FOLLOW: Tells Google "Do not index my pages but go ahead and analyze links found on this page." I can't think of a time this would really be used.
- INDEX, NOFOLLOW: Please index my page but do not follow any links found on this page. You wouldn't use this really unless you had a link farm type site and you didn't want any link juice to pass to links on your page.
- NOINDEX, NOFOLLOW: Please do not index my page and do not harvest any links found on this page, this is set to "go off the grid".
Have you read the other articles about how to optimize your Magento or eCommerce store for SEO? Catch up now. Read the full Magento SEO Guide.
9. XML Sitemap
We all realize that web indexes can recognize pages on a site through its internal (and external) linking structure. Nonetheless, the most comprehensive and accessible strategy of providing our site structure to search engines, by a long shot, is a valid XML sitemap that is transferred to a search engine's Webmaster Tools (for example, Google Webmaster Tools or Bing Webmaster Tools).
Naturally, the development team behind Magento understood that manually creating an XML sitemap from steadily evolving pages, products/items, and category URLs would be an incomprehensible task. Therefore, they built their own special XML Sitemap Generator.
With a specific end goal to create our XML sitemap, we must first configure its contents. Navigate to System > Configuration > Google Sitemap and configure Frequency and Priority for our fundamental main page types. We can likewise arrange how frequently we need to produce our sitemap.
Contingent upon our Magento store setup and content, we may decide that our categories are the most important pages. For Magento, your category pages are gold as they're the most optimized pages for broad search terms and we want search engines to find and index them first. Our next most essential pages would be our individual item/product pages; we want those to appear in search engines for customers searching specifically for our product names. This typically is more important for companies that develop their own products (that they market) or resell brands such as Air Jordan or Wilson Footballs. It might not be as important to companies that white label clothing with weird names like "Whispy Outside Tori Tank" because people will use broad search terms like Tanks Top Pink. The page type with the least priority would normally be our CMS pages.
As mentioned previously, the home page in Magento is classified as a CMS page; subsequently, based on our specifications, it will receive a lower priority. In addition, the home page URL or will be set as http://www.mydomain.com/home, which is not how we want our home page to appear.
The priority is simply a value that is passed to Google in order for it to prioritize the list of pages it will index; it will then (supposedly) do so programmatically.
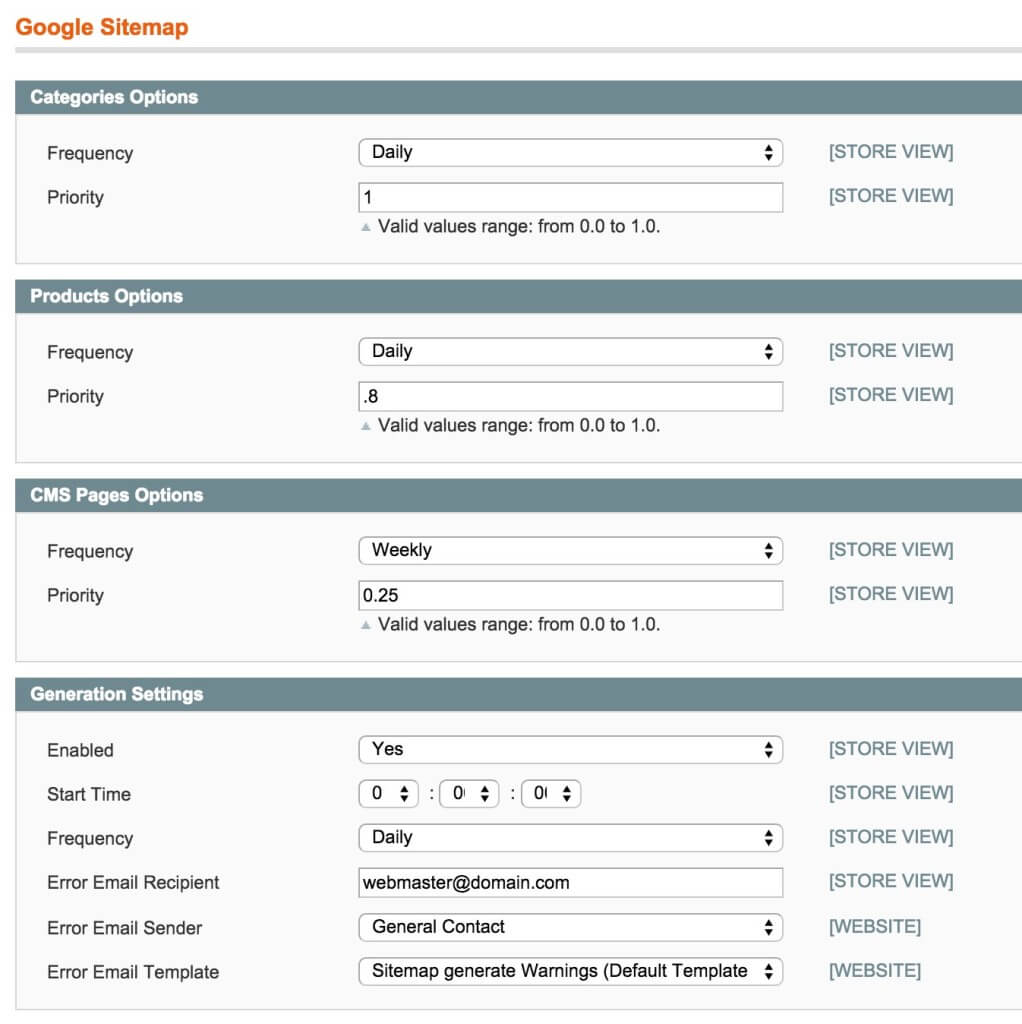
Based upon our chosen SEO campaign, we would set the priority higher for those pages we are optimizing. Therefore, if we are optimizing our categories and products more than CMS pages (recommended) we would set their priorities to match the following:
- Within Categories Options, set Frequency to Daily and Priority to 1.
- Within Products Options, set Frequency to Daily and Priority to 0.8 (or anything less than 1 and more than we are about to set the CMS pages to).
- Within CMS Pages Options, set Frequency to Weekly and Priority to 0.25.
- Within Generation Settings, set Enabled to Yes, Start Time to 01 00 00 (01:00 a.m. or you can use another time that your traffic is at it's lowest), and Frequency to Daily, and enter your e-mail address into the Error Email Recipient field.
- Click on Save Config.
In the end, we should have something that looks like this:
In order for our generation settings to automatically generate our sitemap, the Magento CRON must be enabled. A quick tutorial on how to do this can be found here: Magento Cron
Login to your Magento admin interface and go to: System > Configuration > System. Then using the ‘Cron (Scheduled Tasks)’ tab enter the following information:
Generate schedules every: 1
Schedule ahead for: 1
Missed if not run within: 30
History cleanup every: 120
Success history lifetime: 120
Failure history lifetime: 120
You can then set cron jobs to run at virtually any interval. I have mine set to 15 minutes for most of my clients due to their use of custom modules related to scheduled tasks.
Our next step is to make sure that we have an XML sitemap that will be updated based on these settings. To do this, we need to first create one as follows:
- Navigate to Catalog > Google Sitemap and click on Add Sitemap.
- For Filename, enter sitemap.xml.
- For Path, we can specify a path, but we would usually place an XML sitemap on the root of our website (enter /).
- If we have multiple store views, we can enter a specific sitemap for each Store View (in which case we would change our filename to suit the convention, for example, sitemap_en.xml for English).
- Click on Save & Generate.
- This should generate an XML sitemap in our chosen path with our chosen filename. We can test this by visiting our path/filename in the URL, for example, http://www.mydomain.com/sitemap.xml.
If an error message appears informing you that the specified directory is not writable, please make sure that the folder specified under Path has sufficient privileges to allow the system to write a file—usually 775, or failing that, 777. Be careful that you don't do 777 on folders that have sensitive information, just in case you have data issues and/or you have more people accessing your server besides your own direct team. If a folder is marked 777 people can updated and overwrite the whole directory.
Once we have confirmed that our XML sitemap is set up and working correctly, we now need to make sure that it has been submitted to our chosen search engine—Google.
There are two ways to do this, but for safety's sake, we would usually perform both:
- Open the robots.txt file and add in Sitemap: http://www.mydomain.com/sitemap.xml.
- Log in to Google Webmaster Tools (www.google.com/webmasters/tools/), click on our website (or add our site if we need to create one), and then, within Crawl, click on Sitemaps and Add/Test Sitemap.
10. Google Analytics
SEO would be irrelevant if there wasn't a way to analyze the stream of traffic through your optimized Magento or eCommerce website.
There are numerous analytics bundles, services, and tools out there, but the most popular by far is Google Analytics (http://www.google.com/analytics/).
Keeping in mind the end goal to set up Analytics adequately on our Magento store, we will need to enter our Google Analytics Account Number (tracking ID) in the admin panel. It is also recommended that we activate eCommerce tracking from within our Google Analytics account.
To do that follow the steps below:
- Log in to our Google Analytics account and navigate to your website's account page by clicking on proper folder.
- Click on Admin located in the header.
- Within this section, we should see three columns: Account, Property, and View. If we wish to find out our Tracking ID, click on Property Settings under the Property column; we can then copy/paste our Tracking ID from here.
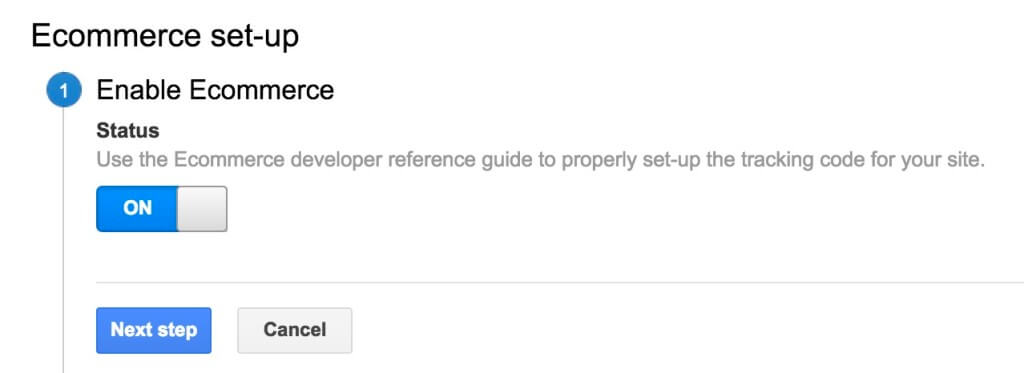
- To turn on E-commerce tracking, we should click on View Settings within the View section and then scroll down to Ecommerce Settings and ensure that the toggle is set to ON.
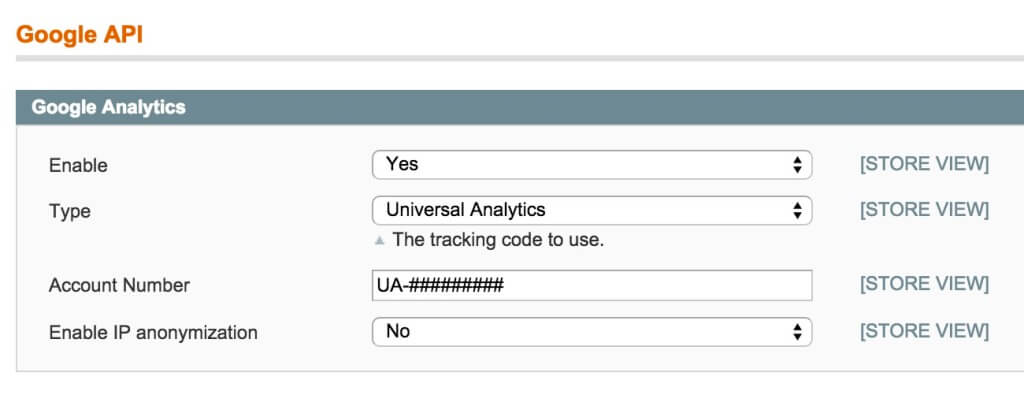
- Now that we have our tracking ID and have enabled E-commerce tracking in Google Analytics, we should navigate to our Magento administration panel and then go to System > Configuration > Google API > Google Analytics.
- Paste in our tracking ID into the Account Number field, set Enable to Yes, and then click on Save Config.
Since we have set up analytics, we will discover a ton of information is now available to us (assuming you have given Google time to index your site and collect some good data), including the ability to track revenue by source and to work out our most effective conversion paths.
To double-check that our website is getting the Google Analytics JavaScript code, we can explore our home page page source. To find your source code, right click on the page and "view page source". Just inside the <body> tag, we should find code similar to the following:
<!-- BEGIN GOOGLE ANALYTICS CODEs -->
// our <script> tag containing our tracking code here
<!-- END GOOGLE ANALYTICS CODE -->
Here's an example:

On the off chance that we don't see this code, it may be the case that the template file has been altered and the tag that includes our Google Analytics code has been removed. If this is the case, double-check your standard template files (1column.phtml, 2columns-left.phtml, 2columns-right.phtml, and 3columns.phtml, usually found within app/design/frontend/yourpackage/yourtheme/template/page) to very that these two snippets of code are in place and working.
<?php echo $this->getChildHtml('after_body_start') ?>
<?php echo $this->getChildHtml('before_body_end') ?>
Lastly, Conversions will not be tracked if the proper code is not added to the success page once someone places an order.
- Generally, adding the tracking code to the Magento HTML Head through Magento’s configuration (Configuration > Web > HTML Head) should be enough. If for whatever reason it doesn’t seem to be tracking on the success page (sometimes a theme or extension will overwrite parts of Magento’s default functionality), then you might have to add the code in manually.
- To do this, using your FTP/SFTP client, navigate to /app/design/frontend/template/checkout/success.phtml
- Open that file in an editor and add the Google Analytics tracking code to the very bottom of the file. Save it, and reupload it.